Arduino, 피에조 부저
Buzzer의 종류
| Active Buzzer (능동형 부저) | Passive Buzzer (수동형 부저) |
|---|---|
| 有源蜂鸣器 (KY-012) | 无源蜂鸣器 (KY-006) |
| 회로가 내장되어 있어, 전원만 인가하면 소리가 나므로 프로그램 제어가 편리함 | 내부에 진동원이 없어, 스케치에 주파수를 지정하여야만 소리를 냄 |
| 원하는 주파수의 소리를 낼 수 없음 | 원하는 주파수의 소리를 만들어낼 수 있음 |
| 패시브 부저에 비해 비쌈 (모듈 1개 0.9위안) | 액티브 부저에 비해 저렴 (모듈 1개 0.8위안) |
 |
 |
 |
|
 |
|
 |
 |
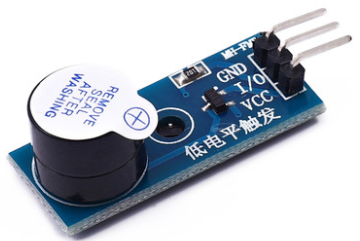
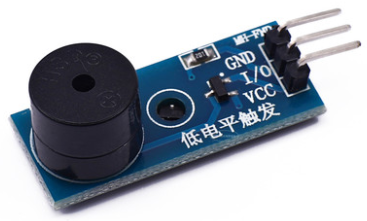
- 모듈로 판매하는 제품의 경우 겉모양으로는 구별이 어렵다. Active Buzzer의 경우 초기 판매시 스티커를 붙여서 판매하지만, 스티커가 떨어져 나간 상태라면 Passive Buzzer와 구별하기 어렵다. 또한 반드시 스티커가 붙은 형태로 판매하는 것도 아니다.
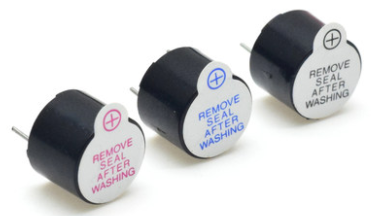
- Active Buzzer의 경우 스티커로 사용전압을 표시하기도 한다. 빨간색은 3V, 파란색은 5V, 보라색은 12V용이다.
- Active Buzzer 모듈의 경우 低电平触发(혹은 Low Level) / 高电平触发(혹은 High Level) 2가지 형태로 표기가 되어 있다. 低电平触发은 DigitalWrite에서 HIGH일 때 소리가 나며, 高电平触发은 LOW일 때 소리가 난다.
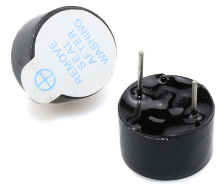
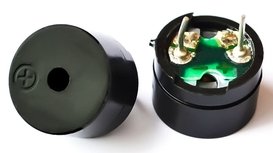
- 모듈 형태가 아닌 단일 부품의 형태라면 연결 핀이 나와 있는 아랫면을 보면 구별할 수 있다. 일반적으로 Active Buzzer는 검은색 실리콘으로 밀폐되어 있으며, Passive Buzzer는 핀의 접합부위가 그대로 노출되어 있다.
- Active Buzzer와 Passive Buzzer를 구별하는 가장 좋은 방법은 사용전압에 해당하는 전압(낮은 전압의 건전지도 가능)의 건전지를 연결시켜보는 것이다. 소리가 나면 Active, 나지 않으면 Passive라고 생각하면 된다.
Active Buzzer
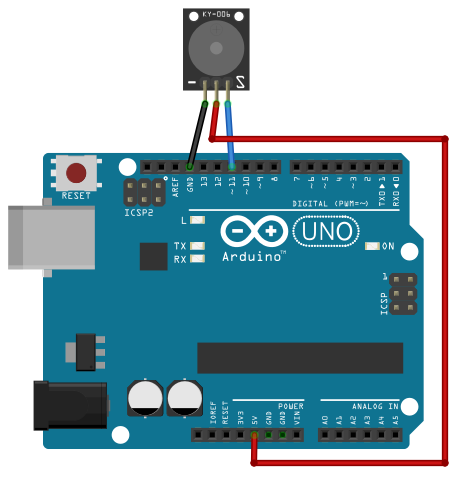
schematic
sketch
1 | void setup () { |
과제
tact 스위치를 누르면 액티브 부저 소리 울리기
Passive Buzzer 사용
주파수
- 0옥타브(C0
B0): 1631(Hz) (초저주파) - 1옥타브(C1
B1): 3362(Hz) - 2옥타브(C2
B2): 65123(Hz)- 중저음
- 3옥타브(C3
B3): 131247(Hz)- 기본 음계에 해당하는 옥타브
- 4옥타브(C4
B4): 262494(Hz)- 일반적으로 고음이라고 불리는 영역
- 일반적인 남자의 경우 G4~B4음이 최고음
- 음악의 기준음인 **가온 라(A4)(440Hz)**가 속한 영역
- 5옥타브(C5
B5): 523988(Hz)- 일반적인 여성의 경우 D5의 음까지는 낼 수 있고, 고음을 잘 내는 경우 E5까지는 무난함
- 6옥타브(C6
B6): 10471976(Hz) - 7옥타브(C7
B7): 20933951(Hz) - 8옥타브(C8
B8): 41867902(Hz) - 9옥타브(C9
B9): 837215804(Hz) - 10옥타브(C10
B10): 1674431608(Hz) (초음파)
한 옥타브 내려가면 주파수가 1/2배, 올라가면 2배가 되고, 한 음계 올라가면 2^(1/12) 배가 된다.
0옥타브 중간쯤(20Hz)부터나, 10옥타브 중간쯤(20kHz)부터는 소리가 들리지 않는다. 사람의 가청 영역을 벗어나기 때문. 이를 각각 초저주파, 초음파라고 한다. 어릴 수록 고음이 잘 들리기 때문에, “선생님은 못 듣는 벨소리”같은 것을 만들수 있다.
| 0 | 1 | 2 | 3 | 4 | 5 | 6 | 7 | 8 | |
|---|---|---|---|---|---|---|---|---|---|
| C(도) | 16 | 33 | 65 | 131 | 262 | 523 | 1046.5 | 2093 | 4186 |
| C♯ | 17 | 35 | 69 | 139 | 277 | 554 | 1109 | 2217.5 | 4435 |
| D(레) | 18 | 37 | 73 | 147 | 294 | 587 | 1175 | 2349 | 4699 |
| D♯ | 20 | 39 | 78 | 156 | 311 | 622 | 1244.5 | 2489 | 4978 |
| E(미) | 21 | 41 | 82 | 165 | 330 | 659 | 1318.5 | 2637 | 5274 |
| F(파) | 22 | 44 | 87 | 175 | 349 | 698.5 | 1397 | 2794 | 5588 |
| F♯ | 23 | 46 | 92.5 | 185 | 370 | 740 | 1480 | 2960 | 5920 |
| G(솔) | 25 | 49 | 98 | 196 | 392 | 784 | 1568 | 3136 | 6272 |
| G♯ | 26 | 52 | 104 | 208 | 415 | 831 | 1661 | 3322.5 | 6645 |
| A(라) | 28 | 55 | 110 | 220 | 440 | 880 | 1760 | 3520 | 7040 |
| A♯ | 29 | 58 | 116.5 | 233 | 466 | 932 | 1865 | 3729 | 7459 |
| B(시) | 31 | 62 | 123.5 | 247 | 494 | 988 | 1975.5 | 3951 | 7902 |
Pin Map
| Arduino | Active Buzzer | Passive Buzzer |
|---|---|---|
| 11 | S | S |
| 5V | 표기없음 | 표기없음 |
| GND | (-) | (-) |
sketch : Passive Buzzer
tone() 사용방법
tone 함수는 3개의 매개변수(핀, 주파수, 음길이)를 사용하며, 마지막 매개변수(음길이)는 생략 가능하다.
1
tone(11, 262, 500); // 11번 핀에 연결된 부저에 C3음을 0.5초 연주
마지막 매개변수를 사용하지 않고 tone을 연속으로 사용하는 경우 주의가 필요하다. 예를들어,
1
2tone(11, 262); // 11번 핀에 연결된 부저에 C3음을 0.5초 연주
tone(11, 294); // 11번 핀에 연결된 부저에 D3음을 0.5초 연주이렇게 tone을 연속으로 사용하면 C3음을 소리낸 이후에, D4음을 내는 것이 아니라 C3음이 계속되므로, noTone함수를 사용하여 소리 출력을 멈추어야 한다.
1
2
3tone(11, 262); // 11번 핀에 연결된 부저에 C3음을 0.5초 연주
noTone(11);
tone(11, 294); // 11번 핀에 연결된 부저에 D3음을 0.5초 연주마지막 매개변수를 사용할 때, 중간에 음을 멈추는 구간을 만들려면, delay를 사용한다.
1
2
3tone(11, 262, 500); // 11번 핀에 연결된 부저에 C3음을 0.5초 연주
delay(600);
tone(11, 294, 500); // 11번 핀에 연결된 부저에 D3음을 0.5초 연주C3음을 0.5초 소리낸 후 delay(600) 에 의해 0.6초를 쉬는 것이 아니라, delay(600) 의 시간 중, 0.5초는 C3음을 소리내는 데 사용하고, 나머지 0.1초를 쉰다.
예시
도레미파솔라시도
1 | const int BUZZER_PIN = 11; |
노래 연주: Super Mario Theme
1 | /* Arduino Mario Bros Tunes With Piezo Buzzer and PWM |
노래 연주: 학교종이 땡땡땡
1 | const int BUZZER_PIN = 11; |
과제
- 크리스마스 캐롤 만들어보기
- 크리스마스 캐롤 연주시에, 음이 바뀔때마다 신호등 LED점멸 바꿔보기
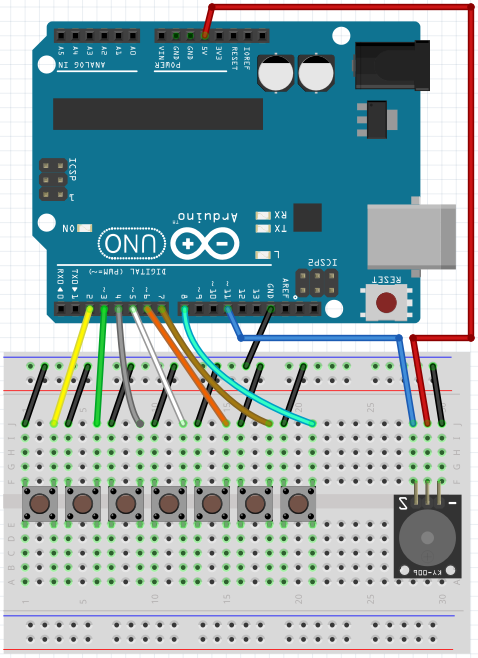
미니 피아노 만들기
패시브 부저와 스위치를 사용하여 미니 피아노를 만들어보자.
schematic
sketch
1 | const int BUZZER_PIN = 11; |
과제
23명의 학생이 모여 23 옥타브를 사용하는 피아노 연주곡 만들어보기
Arduino, 피에조 부저